
GEAR ・ HOW-TO
How to Photograph Fireworks — Tripod, Bulb, and the Handheld Way
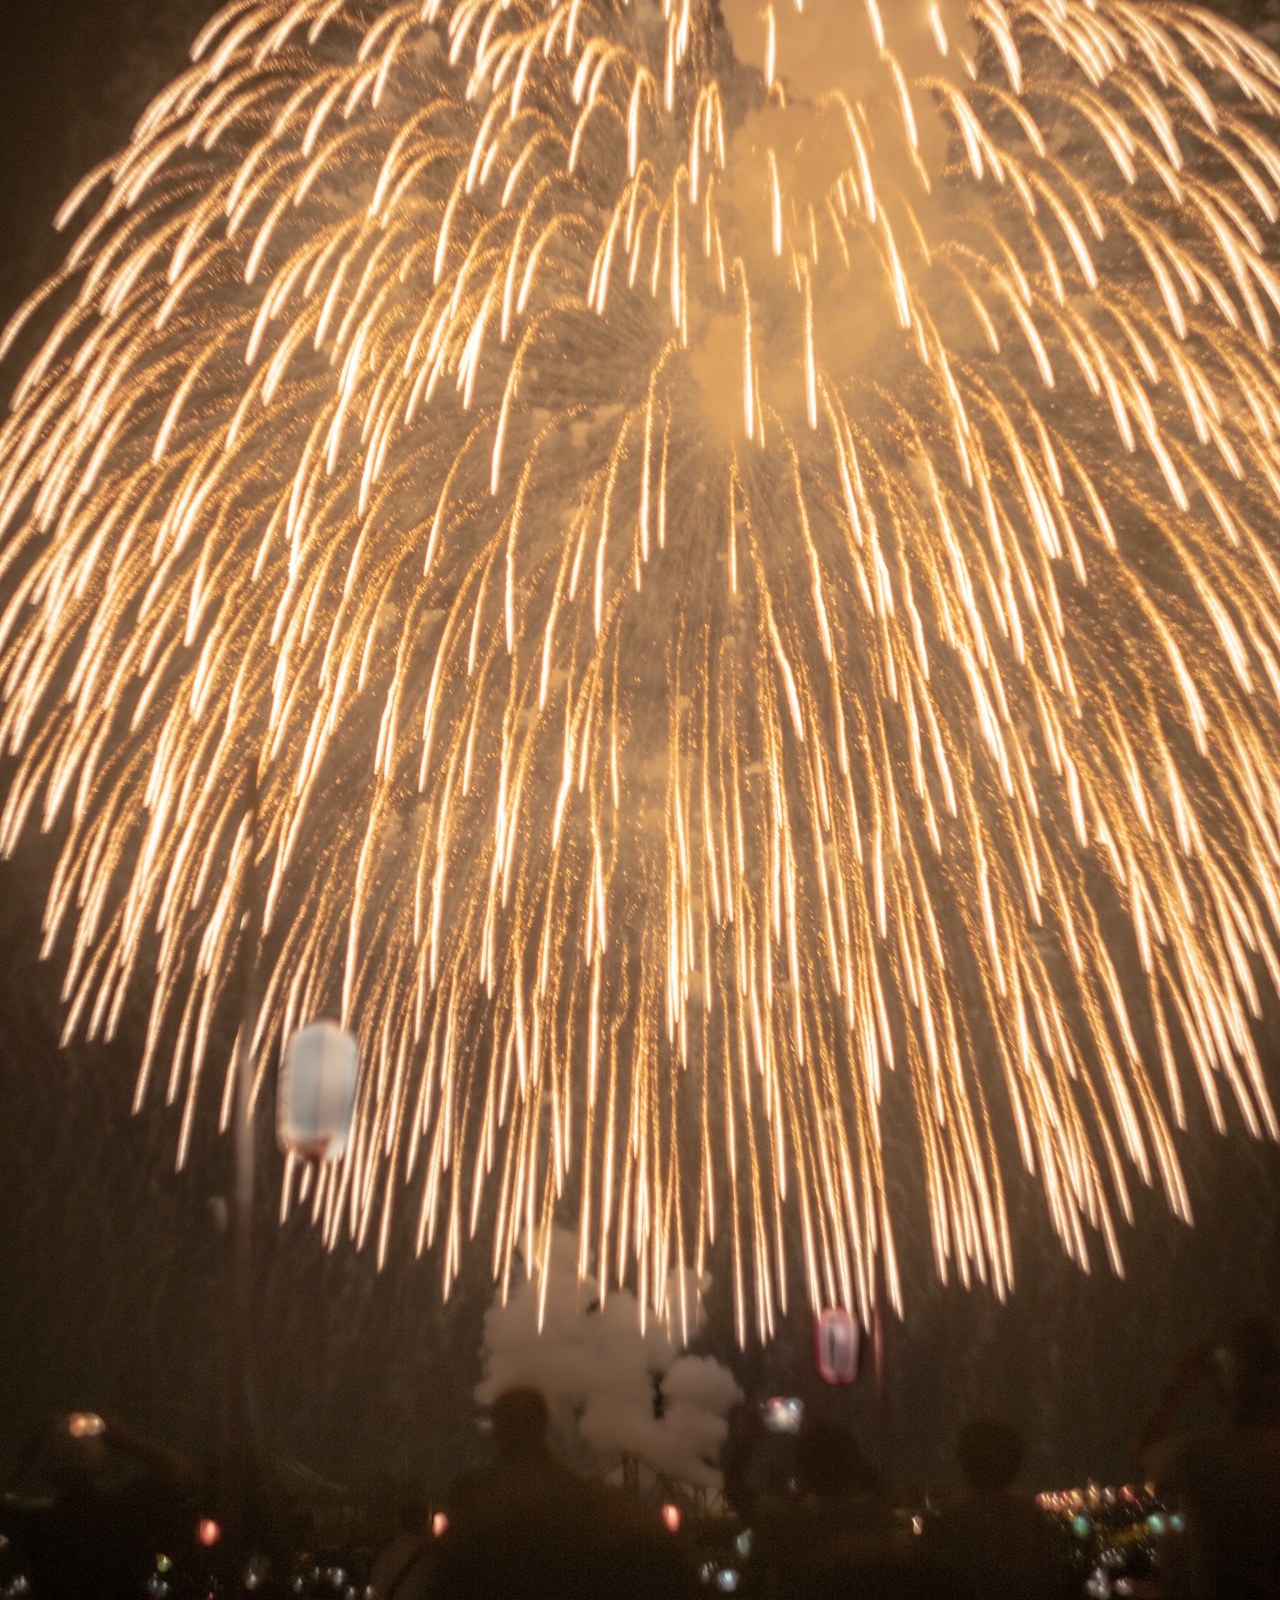
Fireworks are decided before you ever press the shutter. Not by your finger, but by where you stand, which way the wind carries the smoke, and how firmly the tripod is planted. Get those right and the rest is simply holding the shutter open from the moment a shell opens until its last trail of fire falls. That is the orthodox method, and the first half of this article covers it properly. Then comes the other way. The two prints from the Nagaoka Fireworks Festival shown here were made with no tripod and no bulb at all — handheld, in burst. Not a question of which is right; there are simply two roads.
First, the orthodox way — why a tripod
What makes fireworks different from ordinary photography is that the open shutter itself is the picture. From the burst to the last falling ember takes a few seconds, and capturing that whole arc means exposures of two seconds to well over ten. There is no handheld version of this. (What handheld can do instead is further down the page.)
There is a second reason. Fireworks photography is waiting in one fixed frame. After a few shells you can read where in the sky they open; once you know, you leave the camera exactly there and simply open and close the shutter each time. A tripod stops shake, but it also keeps a composition you chose two hours ago. Riverbanks are dark, crowded and gravelly. Set it once, never move it.
More on technique and gear
The same tools, the same light. Read on and the craft joins up.
Choosing your spot — the wind decides the picture
The single most useful forecast is the wind. Every shell leaves smoke behind. Stand where the smoke drifts away from you and the sky stays clear right through the finale; stand downwind and the frame turns milky within fifteen minutes, after which everything looks dull no matter what you do. Wind direction is in any weather app — read it against the venue map and stay out of the drift.
Then decide whether the ground goes in the frame. Lights on the far bank, paper lanterns, silhouettes of upturned faces, reflections on the water. Include them and it becomes this town's fireworks; crop them out and you get pure light. Neither is more correct — it depends on what you want the night to have been.
Exposure — bulb, low ISO, f/8 to f/11
Fireworks are not a subject where you balance brightness with ISO and shutter speed. The shell is a self-luminous point source, so in practice the aperture alone controls how bright it renders. Lock ISO low, around 100. Raising it only blows out the highlights and adds noise.
Set the shutter to bulb. Open when you hear the shell go up, close when the trails have fallen. That captures one whole burst. During a rapid sequence you can hold it open for two or three, but stack too many and they merge into a white blob. Start at f/8–f/11 and adjust one shell at a time — closing down if it is too bright, opening up if too dark. Focus manually on the first burst using a magnified live view, then do not touch the ring again.
To avoid touching the camera, use a remote release (or the self-timer, or your camera's phone app). A release with a bulb lock means no finger pressure on the body at all. An inexpensive one does the job perfectly well.
The other way — handheld, chasing the instant
That is the orthodox method: plant the tripod, open on bulb, keep one whole shell as a single unbroken exposure. It is reliable, it is repeatable, and nothing here is meant to argue against it. But the two prints in this article were not made that way. Neither Shosanshakudama over Nagaoka nor Crimson Night involved a tripod or the bulb setting. Both were shot handheld, in burst.
Why work like that? In my own words:
The method in this article is the orthodox one. Mine is handheld — and handheld is how I can catch a moment of beauty from an angle nobody else is able to copy. If you work the way everyone else works, you end up with what everyone else gets, and that is a little dull, isn't it? I am not saying the orthodox way is wrong. I am saying this is another way that exists. Of course there is camera shake, and because it happens in an instant the framing drifts too. But sometimes, inside what chance hands you, there is art and beauty nobody planned.
― IkebanadoctorPlanting a tripod means shooting the same two hours from the same spot in the same frame. You buy stability and you sell the ability to move. Handheld, you can turn your whole body the instant a shell climbs; you can crouch, aim through a gap between paper lanterns, or cut the ground away entirely and give the frame to the sky. The angle that comes out of that is one only you could have taken, standing exactly there, that night. Work the way everyone else works and the picture lands where everyone else's lands.
The cost is real, and worth stating plainly. There is camera shake. Because it is over in an instant, the framing drifts. The keeper rate is nothing like a tripod's — most of the night is unusable. And both example frames were made on a manual-focus Soviet-era lens, the HELIOS-44-2 58mm F2, with focus and aperture set by hand. Night, moving light, handheld, manual. As conditions go, that is close to unreasonable.
I keep shooting this way because sometimes, inside what chance hands you, there is art and beauty nobody planned. You deliberately leave room for what you could never have designed. It is the same argument as keeping flare and ghosting and using them as a tool rather than engineering them away. Rendering cleanly and moving someone are not the same thing.
So this is not a claim that handheld beats a tripod. If these are your first fireworks, use a tripod and bulb without hesitating — handheld without the fundamentals underneath it just produces a pile of failures. Only once you have genuinely walked the orthodox road, and find yourself unsatisfied with arriving at the same frame as everyone else, is it worth knowing that this other way exists.
Living with the smoke
Smoke is not the enemy. In Crimson Night, made at Nagaoka, the crimson and orange smoke filling the whole sky is the subject. A hard white burst rises out of it, and directly beneath, two slender lines record the shell's own climb into the dark. Smoke takes on colour because the following shells light it from within. Whether you read that as haze or as coloured fog changes when you press the shutter.
Still, one clean shell in a clear sky is hard to beat. Shosanshakudama over Nagaoka shows a shell roughly 90cm across and 300kg in weight, opening beyond 600 metres up and spreading some 650 metres wide. It is larger than the eye can take in; golden rays fill every corner of the frame while countless trails hang down like rain. Along the bottom I kept two paper lanterns and the silhouettes of people looking up.
Both frames were shot handheld on a single Soviet-era lens, the HELIOS-44-2 58mm F2 — no tripod, no bulb, as described in the other way above. Pointed straight into a violent light it holds together, and its bloom carries the texture of the smoke. No filter was added — the softness is the lens itself.
Two frames from one night in Nagaoka
Both shot handheld, in burst, on a single old lens — the HELIOS-44-2 58mm F2, with no tripod and no bulb — and printed on FUJICOLOR professional silver-halide paper.
It opens at its widest
in order to disappear.
Go wider than you think
Assume the big shells will not fit. Use the wide end of a standard zoom and leave generous sky. If you try to zoom out once a shell is already climbing, that one is gone. When smaller shells are running, shooting loose and cropping later is the safer bet.
Vertical works too. Fireworks are a subject that grows upward, so a vertical frame suits the climbing trail plus the open bloom. But tipping a ball head sideways on a dark riverbank wrecks both level and height and costs you several shells. An L-plate lets you switch to vertical without tilting the camera at all — worth most precisely where you can see least.
What a phone cannot do
Modern phones have excellent night modes and will produce a recognisable firework. The real difference is whether you decide how long the shutter stays open. A phone's automatic processing aims for "bright without blur", so it closes before the trails have drawn themselves out, and the shell records as a cluster of dots rather than lines. To keep a whole burst as line-work you need a camera with bulb and something to hold it still. For the orthodox method that really is all you need — no long telephoto, no fast glass. Go the handheld route instead and the requirement is the same in spirit: not expensive equipment, just a camera that lets you decide the shutter yourself.
What I pack for a night like this
SLIK Light Carbon E64 II
The carbon tripod I use. Compact and light enough to actually carry, yet it extends to a usable height — two things that normally pull against each other, balanced well here. For night work the decisive quality is simply that it never feels too heavy to bring.
L-Type Quick Release Plate (Arca-Swiss compatible)
Tipping a ball head sideways for a vertical frame wrecks both composition and balance. With an L-plate you re-mount vertically without tilting the camera at all. Arca-Swiss compatible, so it drops onto most heads — and the darker it is, the more this small part is worth.
Beyond that: a remote release with a bulb lock, a spare battery, a cloth for the front element, and a small light for your feet. Long exposures warm the sensor and bring thermal noise, so resting the camera between sequences helps. An ND filter is one way to hold the shutter open longer at a brightly lit venue, but with fireworks the aperture usually covers it.
As an Amazon Associate, Ikebanadoctor earns from qualifying purchases. If you buy through these links, a small part of the sale helps support our work — at no extra cost to you. We only feature tools we genuinely use and can wholeheartedly recommend. These links point to Amazon Japan, where these items are sold.
One thing before you shoot
A fireworks festival is not staged for photographers. Nagaoka's shells rise in memory of the air raid of 1 August 1945 and in gratitude for the decades of recovery since. Keep tripod legs out of walkways, do not block the person in front, carry your rubbish home. Obvious things — and hardest to keep in a dark, elated crowd. When photographers get this wrong, the restrictions tighten the following year.
Dates, access, paid seating and the rest are in the Nagaoka Fireworks Festival spot guide.
The developing approach behind the photographs in this article is gathered into 30 presets for Lightroom / Camera Raw ($15.00 — a ZIP download straight after purchase).
View the presets →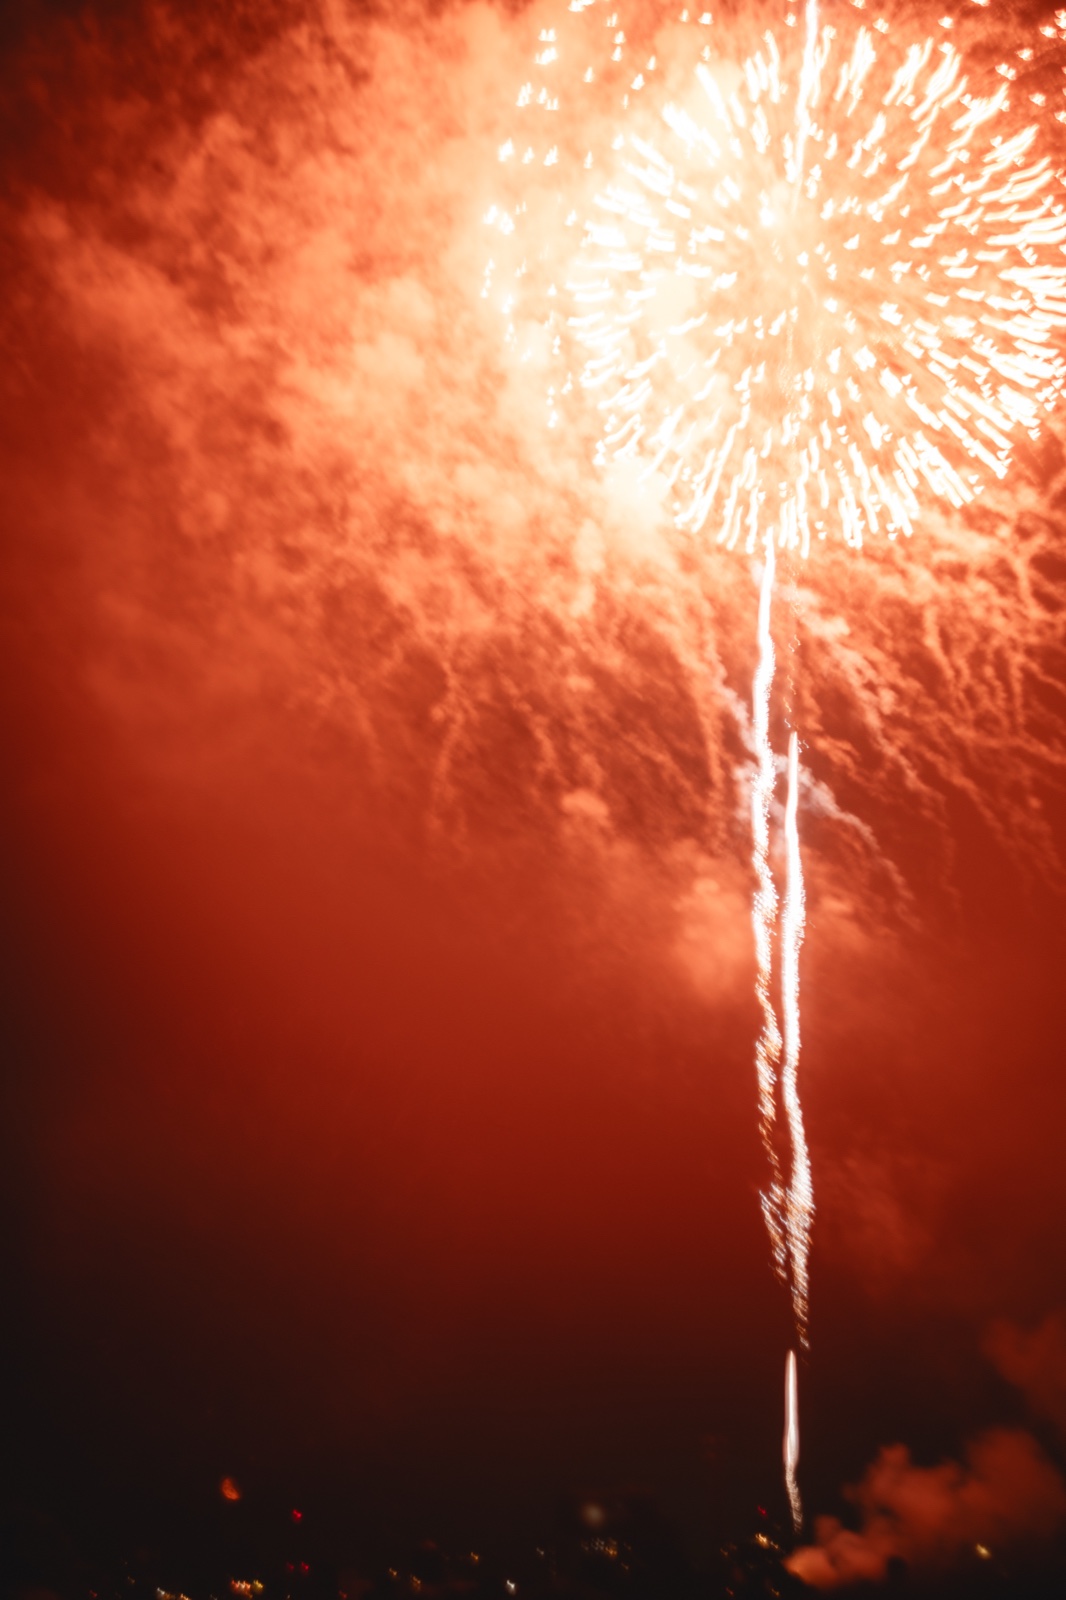
Both example frames in this article are prints we ship worldwide. Because every edge of Crimson Night is part of how it breathes, it is offered in one size only — 6-Cut Wide, which holds the full 3:2 frame with almost no cropping.
🖼️ Choosing a frame (with inner and outer dimensions)
💾 A digital download is also available ($7.00 each). Bundles cost less: 3 for $17.84, 5 for $26.23 ($5.25 each) — mix any photographs you like.
View the 2 fireworks prints →